Tuesday, October 18, 2016

Willa be ready for the cold? (Willie and Billie vests from Laela Jeyne Patterns)


Well, Oklahoma fooled me again for a few days.  We had finally started seeing fall weather here in the land where the wind really does sweep across the plains, and I was so excited I put away the summer gear and pulled out the boots and jeans.  It was perfect weather for the new Willa and Billie patterns from Laela Jeyne!  I couldn't wait to finish my testers so that we could layer up and enjoy the crisp weather, and while I was a little nervous about making myself a vest pattern, I will tell you that these patterns do NOT disappoint.

So, let's run through each pattern really quick:

On the Willa, here are a few basics:
- Large size range: XS to 3X
- Princess seams for a more streamlined fit
- Optional welt pockets
- Can be made with our without a layer of batting for cooler weather
- Fully reversible option depending on zipper choice
- Detachable hood
- No trim pages
- Clear illustrations for each step

And for the Billie:
- Large size range: 6M to 14
- Princess seams for a more streamlined fit OR
- Basic vest option up to size 6 (this makes a perfect unisex pattern for the little guys!)
- Optional welt pockets
- Can be made with our without a layer of batting for cooler weather
- Fully reversible option depending on zipper choice
- Detachable hood
- No trim pages
- Clear illustrations for each step

When the technicals came out for the Willa, I couldn't wait to figure out what fabric I wanted to use. Then, my kids saw them and had to have one so I signed up to test the Billie vest as well.  I didn't even wait to see if I was going to be able to test this one because I was absolutely buying the pattern so I might as well be ready.  

For the test, I made 4 vests: 1 for me, 2 for my son, and 1 for my daughter.  I tried so hard to squeeze in a second one for my daughter, and I just didn't have a chance to do it with fall festival prep. I couldn't find that special fairy sparkle that stops time so I had to give up the ghost on Nini's second vest, but it WILL happen before the end of the week.

I would definitely rate this pattern as more advance due to the princess seams.  They aren't hard, but it does help significantly if you have a little bit of experience doing them.  It takes just a little extra time and work but well worth it for the finished vest (after size 6, the only option is a princess seam to accommodate the female form).

Alright, so this vest took a little extra time for mine and my daughter's because of the prep that goes into stay stitching the princess seams and getting the notches cut before you can assemble, but it wasn't too time consuming.  I think I finished mine in a few hours once I got started...(part of that time MIGHT have been spent staring at the TV watching Stranger Things).  The most tedious part for me was the bias tape because I made my own instead of going to the store and buying it like I originally planned.  I was able to make some continuous binding by using the square method so that helped a lot with getting the tape put together.

For all of my vests, I opted to not do the reversible option so I just used a plain separating zipper, but you can buy a reversible separating zipper and voila!  two vests for the work of one.  I do have one planned with some denim and suede that I think I really want to make reversible and with the welt pockets.  I didn't do them on these ones, and I really wish I would have at least put them on my Willa because I became the pack mule at the Fall Festival and had nowhere to stuff the kids' trinkets after they played every game...where every kid wins something.

The kids wore theirs to go playing when we went out to our friends' property, and it was the perfect coverup for the not quite cold but not quite hot weather here in Oklahoma.  I put my son in two different ones for the photo shoot, and he stopped long enough to let me zip it before he was back out and running about.  They were both the perfect fit.  My son is definitely super tiny (he's almost 6 and was in the 4T) so I'm really glad that's his favorite thing about himself.  I just had to make sure that I didn't bring up that he was wearing a 4T top or he would have taken it off.  HA!  They were plenty roomy for some layering but not so roomy that the kids were swallowed up in them.   My Willa was so comfy and again, not too loose but definitely loose enough to keep up with the kids and their prizes at the festival!

With the option to add batting between the main and lining fabric, this vest is perfectly adaptable to colder weather and will give an extra layer of warm between me and the cold!  I can't wait for the weather to start cooling down so that I can put these to use!  I've been staring at them for the past week now that the weather has shot back up to mid to high 80's.  Boo.  I just hope I remember that I complained about the heat when I have icicles hanging off my ears in the middle of winter!

Now, if you've read to this point, let's find out how you can get your copies of these patterns!  The Billie vest can be purchased here, and right now it's on sale for $5.  The Willa is available here, and you can get your copy for $6.50.  Now, if you want both, the bundle package is available for the sale price of $10.  Don't miss out on these perfectly for fall patterns because the sale ends at 1159PM on Friday, 21 October.  After that, you'll have to pay the full price to get in on the outdoorsy goodness! So, go grab your copy and sew yourself and your munchkins some vests!

Blessings and Happy Sewing,
Kim


Tuesday, September 27, 2016

Romper revisited (Sasha Collection from Laela Jeyne Patterns)

I have a love hate relationship with rompers.  I love them because they are comfortable and an all in one outfit, but I hate them because I have to completely strip to use the restroom.  However, when Marisa said she is adding some options (particularly the pants option) to her Sasha Easy Fit and creating a collection from it, I was absolutely in for testing.  I really do love this pattern for so many reasons.  Let’s do a quick run down of what this pattern includes:

- Large size range: XS-XXL
- Two bodice types: faux wrap or mandarin collar button down
- Bottom styles: blouse, mini skirt, knee length skirt, maxi skirt, shorts, pants
- Three sleeve lengths: sleeveless, short, long
- Two waist options: drawstring or elastic
- No trim pages which makes for easy pattern assembly
- Layered printing so you print only the size(s) you need
- And, as always, clear concise directions with illustrations for each step


So really, with these many options, you could make something for each day of the week and no two would look the same!  I opted for a button down, sleeveless pantsuit for the test, and I had some erally soft drapey rayon challis that I had picked up from JoAnn’s that I decided to use. 

Construction took a bit of time on the bodice only because of the placket and the collar.  They aren’t hard to do, but it does take a little bit of working and slow going to make sure that all of the edges were lined up properly.  Due to those two pieces of the bodice, I would definitely recommend some experience with collars and plackets.

The fit for the romper is extremely forgiving.  It has a loose flowing, retro feel to them, and I felt like I had stepped back into yesteryear a little when I put it on!  I did add a belt, though, because I did the elastic waist and wanted something to break up the pattern of the fabric.  I literally want to live in this romper!!  I don't even mind that I had to strip down to my undies to go to the bathroom! 


It really didn’t take me too long to make this romper.  In all, it was about a three hour project, and once you have the bodice put together, you can zip right through the bottoms and waist.  I did take a little extra off the bottom to accommodate my short stature.  The pattern is drafted for a woman about 5’5”, and I’m 5’1” so I shortened the pants 1.25”, and it was the perfect length.


Okay, so if you’ve read this far along, let’s get some info about how you can get your own copy of the Sasha Collection!  It was released yesterday and is available for purchase at Laela Jeyne Patterns. It's available right now for the special release price of $6.50, BUT, until tomorrow night (28 Sept) you can get it for $5.50 by picking up the coupon code that Marisa has available for Laela Jeyne group members.  Head on to the Facebook group and grab the code OR join the group and grab the code!  The pattern will be available for the special release price until Saturday (1 Oct)!  Now, go get yourself a copy of the pattern and make yourself a Sasha!

Blessings and Happy Sewing,
Kim

Thursday, September 15, 2016

For the honor of the Petal!! (Lilly's Petal Skirt from Snuggle My Baby Patterns)


My daughter is a tree climbing, bug catching, no skirts kind of girl.  I can't say it's entirely her fault because I kind of don't wear skirts very often so I guess she learned that from me.  Well, Jennifer Gunn from Snuggle My Baby Patterns, posted a photo of a skirt she made her daughter and asked for an interest level.  I decided to go ahead and apply for it because my neighbor's granddaughter loves skirts and really does TWIRL ALL THE THINGS!!!  I was pretty excited when Jenn sent me the "Congratulations, you've been selected to be on the test team" email!  Enter the Lilly Petal Skirt...and I was in love.
One of the few standing still moments I could get from her!
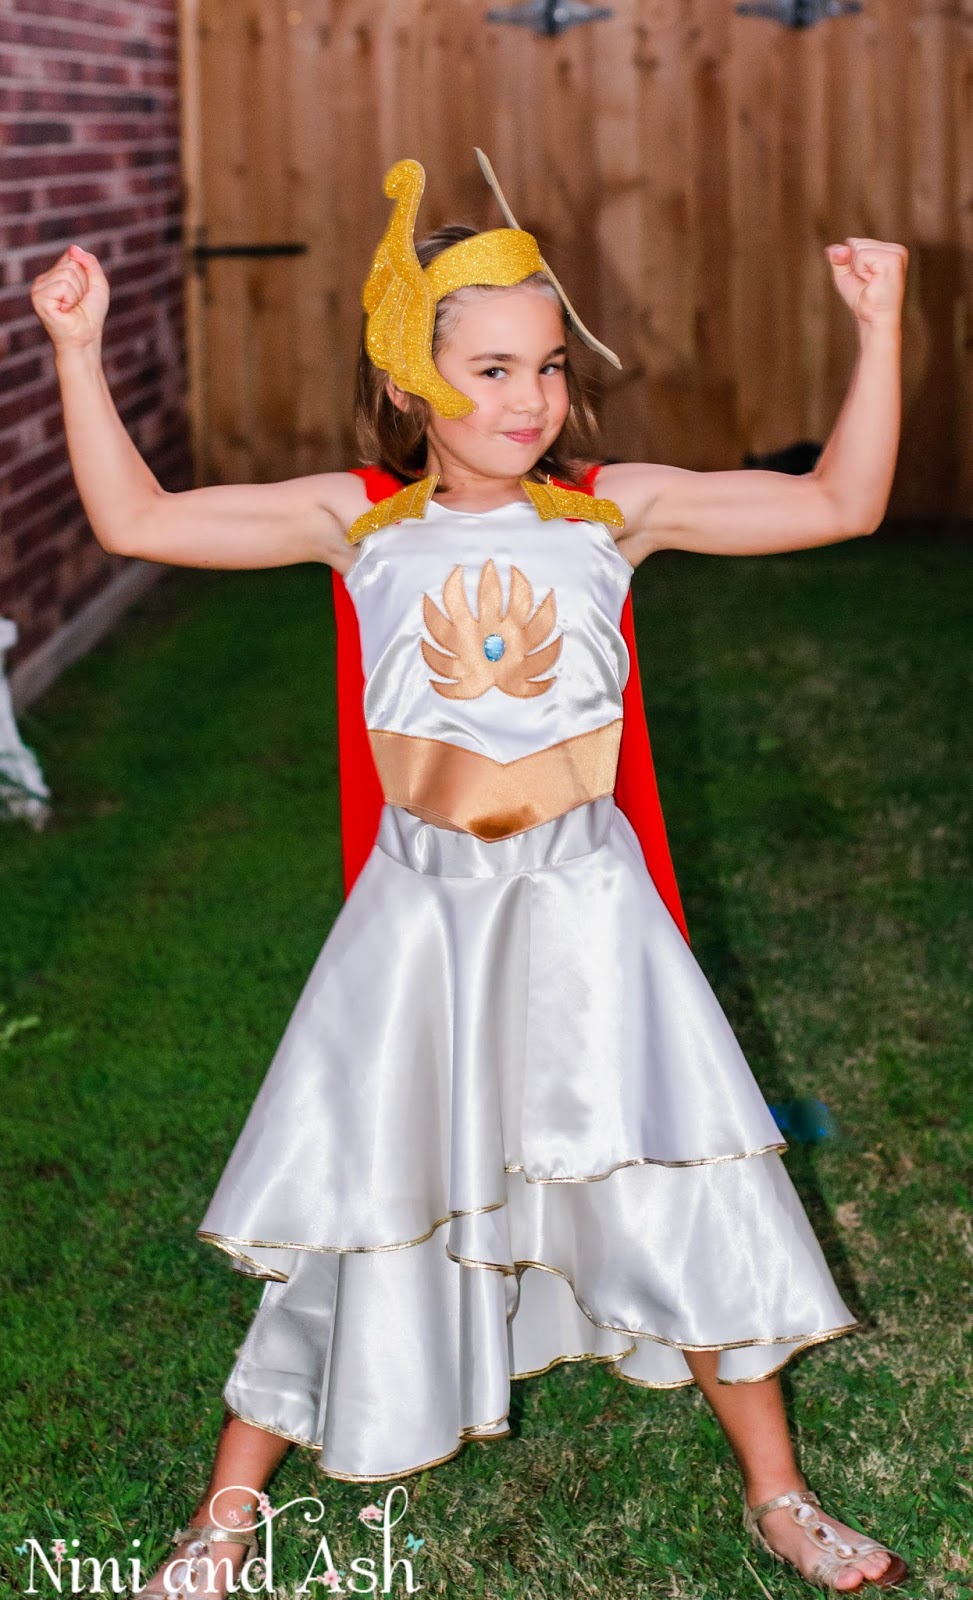
THEN, she added a costume contest aspect to the test, and I had to figure out how to get my bug catcher to WANT to wear this skirt because I needed her to need this skirt.  Now, the kids have been watching the original He-Man cartoons the past few weeks (shout out to the 80's!) and she said, "Momb, can I be her!?!"  The "her" she was referring to was She-Ra.  I tried to play it cool and calmly replied that I THINK I have something I can do for this (fist pump, I'm going to make this for my daughter, too!!)  So, I made the costume, even got a headdress made, and she said, "Um, I think I want to be a horse instead."  I think I could have doubled for Grumpy Cat when I told her no.
The start of our photo shoot.  I wanted to punch myself in the face at this point.
So this skirt is amazingly simple to make, but it is also amazingly beautiful when done...let's get some basics out here so you know what you're getting with this pattern:

- Large size range: 2T-16
- Button closure on the side (so no zipper)
- Elasticized waist for a more comfortable fit
- Bias binding along the edges of the skirt for a really unique finishing look
- Clear, concise directions and photos with each step
Can She Ra fly?  She can't?  That's lame.
I made two skirts for testing.  The first was a size 3T with a 4T length, and it was amazingly easy to just modify and mesh sizes as needed to get the skirt to fit right on my little model.  I used a wondermous ombre feather quilting cotton that I got from Ozark Fabrics on Facebook, and I bought the bias tape.  You CAN make your own but when it said I needed 9 yards of it, my ambition took a major nosedive.  I purchased some from JoAnn's.  Some of the testers had greater persistence and "stick to it" ness than me and made their own...it turned out amazing, by the way.  My little model was over the moon excited about her dress, and it was a fight to get some good standing still pictures of her because she just wanted to twirl until she couldn't stand.  The petal construction of the skirt makes this an amazing twirl skirt.
The twirl made She Ra cool again...
Soo, when it came to my daughter and modeling this for me, there was no love.  She didn't want it because she wanted to be a horse.  However, once we got She-Ra fully outfitted, she was pretty excited.  She asked if She-Ra can fly, and when I told her that she couldn't, She-Ra was lame again. Until...the twirl.  Then, She-Ra was "the bomb.com, Mom!"  Seriously, I don't even know where she gets this stuff.  We spent a good hour just spinning in circles.  Well, by "we" I mean "she".  I get motion sick on the teacups at Disneyland so I wasn't spinning with her.  Her entire outfit was satin and chiffon, and it was pretty awesome.  I did her skirt in a size 6 with a size 7 length.  Again, really easy to mod as needed.  I kinda want to be She-Ra for our Fall Festival this year. The satin was actually pretty easy to work with, and it did drape differently than the quilting cotton. However, both skirts were still beautiful, and I really do think that this skirt is perfect with pretty much any woven material.

My daughter loves this skirt so much that she actually has asked for another one.  This time, however, she asked to be a lettuce.  Her school has Spirit Week coming up and one of the days is, well, um, Salad Dressing Day.   The elementary grades are dressing up as pieces of a salad while the middle school and high school will dress up as salad dressing types (Italian, Ranch, Thousand Island...).  I just can't wrap my brain around where that came from, but my daughter said this skirt is perfect because "when I twirl, I'll look like a blooming lettuce!"  I do believe we will be going with satin again for the material just because I loved how it draped.  I might even add some chiffon to the lettuce one...not really sure yet on that, but I do know that we will have another skirt, it will be green, and it will be twirlarrific!

I really do love this skirt, and I absolutely plan to make one for myself when Jennifer gets around to designing a big kid version of this skirt.  And I will twirl in it just like my daughter did in hers. Maybe not as long, though.  I did mention me and the teacups, right?  Construction was so simple, and it took me maybe an hour to finish each skirt.  The unique placement of the petal circles gives this skirt a beautifully different look, and the simplicity of it is what gives it its elegance.

Okay, so here we are at the part where I tell you how to get your own copy of this amazing skirt pattern!!  This released on the 14th of September and is available for a special release price of $5.  It will be available at this price only until the 24th of September so don't miss your chance to get in on this deal!  You can get the pattern here at Jennifer's Snuggle My Baby webstore or here on Jennifer's Etsy store.  You can also join the Snuggle My Baby community on Facebook to keep up to date on Jennifer's happenings or to ask questions if you hit a head scratch while sewing up your own SMB creations!  Now, go grab your copy of the pattern, head over to join the FB group, and I'm going to go see a girl about some lettuce!  Thanks so much for reading along.  I really do appreciate you all so very much!

Happy Sewing and Blessings,
Kim

Saturday, August 27, 2016

Are you a krill?

Photo source: www.nextnature.net
Last night, the kids decided they wanted to watch Happy Feet 2...again.  I was sitting there watching the movie, and for those who haven't seen the movie, let me ruin it for you.  Essentially, the Emperor penguin nation is at risk of complete annihilation due to a freak incident.  The main character, Mumble, and three little penguin chicks are the only ones left on the surface, and it falls on them to save the Emperor nation.

The penguins face starvation, hawk attacks, and death.  Mumble goes to the ends of the Earth to enlist help.  He calls on penguin friends and elephant seals to try to make a way for the trapped penguins, including his wife, to get back to the surface.  We're talking powerhouses in their world.  If you've never seen an elephant seal, those suckers are HUGE!

Now, there is a side story about Will and Bill Krill.  They're best friends.  Will, I think?, is called to a life outside the hive (sorry, I don't know much about krill so that might not even be what they are called).   He has a calling to be more than just another krill waiting to be whale food. So, he sets out to find his destiny, and Bill follows because that's what friends do.

Well, if you've ever seen Happy Feet, Mumble had taught the entire colony how to dance, and that carries on through the second movie.  Bill ends up in the middle of the trapped colony during part of the movie, and he witnesses this dancing thing.
Photo soure: www.surfersvillage.com
Okay, so fast forward to the end of the movie, and there is a dancing/singing number where the powerhouses are at the surface dancing to get the ice to drop and create a path for the trapped penguins to climb up.  At this point, Will, the prodigal son, has returned to the rest of the collective and hears the dancing above them.  He starts to dance on the ice under the water, telling  Bill that it "brings out his happy".  SOOO, the rest of the krill join him in dancing.  It's a pretty neat little scene, to be honest...probably my favorite part of the movie.  As the dance ends, Will stomps his foot and his one little stomp cracks the ice in just the right way that it travels the distance of the iceberg and cracks it, causing the ice to break and come crashing down to create this path that the penguins can climb up.

So, as I'm watching this, I think to myself that just one tiny, seemingly insignificant step saved a nation.  It was an act that nobody on the surface knew about.  In fact, they didn't even know that this little krill even existed.  However, his one little step saved a nation.  Think about that!!!

Every day, we go through life and live out our days.  We meet people, we do things, and we affect people in small, seemingly insignificant ways.  To us, most of the stuff we do is just stuff .  We never know how our actions can impact others, and oftentimes, we don't even see the results of our actions. What would happen if YOU, a tiny little krill, touched someone's life so deeply that they then take up the cross and save a nation.  What if your one little act changes something so significantly that you save a nation without even knowing it?  We hear that small voice speaking to us:

"The Lord said, "Go out.  Stand on the mountain in front of me. I am going to pass by.  As the Lord approached, a very powerful wind tore the mountains apart.  It broke up the rocks.  But the Lord wasn't in the wind.  After the wind there was an earthquake.  But the Lord wasn't in the earthquake.  After the earthquake a fire came.  But the Lord wasn't in the fire. And after the fire there was only a gentle whisper." (1 Kings 19:11-12, NIrV).

What if we stopped, listened, and heeded that still, small voice urging us to action?  That still, small voice that is the foundation of our very being.  What if we obeyed the words whispered in our ears?  Could we then save a nation?  So, tell me, are you a krill?

Back to School, Bugs! (Lulu & Celeste, Sprouting Jube Jube Back to School Tour)


My kids don't get excited about back to school clothes because they wear uniforms, and there is NOTHING exciting about going to the uniform store to pick out khaki slacks and embroidered polos. However, this year, as part of the Lulu and Celeste, Sprouting Jube Jube productions "Back to School" blog tour, I made them clothes for those few casual clothes days they have so there was a tiny spark on the excitement train. I'm just glad that they are still willing to wear the things that I make for them...most of the time!

So, for my stop on the tour, I knew that the newly released Emmy t-shirt from Laela Jeyne Patterns was perfect for both of my kids, and my daughter also got a pair of  Little Birdy pants to go with one of her tops, also a Laela Jeyne Pattern!  One of my favorite parts about this pattern is that it can also be made for boys up to size 6.  The pattern itself goes up to a size 14, and it's unisex through size 6 so my son got a new shirt as well.  I feel so bad that my little guy kind of gets left out a lot so he was over the moon trying to pick out his fabric from "Momb's store".  I'm not sure if I should laugh or cry that he thinks my fabric collection qualifies as a store...I probably do have more fabric than Jo-Ann's, though.

The top is designed to be a fitted t-shirt so it's not quite as loose as a standard tee, which my daughter loved!  She won't wear about two-thirds of the tee shirts in her dresser because they're "too flowy".  I also opted for a hood with two of their shirts because the weather does get nippy here in Oklahoma, but there are options for a standard neck and a cowl neck (which might not be a bad idea either since it covers the neck...another project maybe?).  I also made my girl a top with a standard neckline.


The Emmy comes with a lot of options so you can make a ton of these and no two would look the same.  You have three different neck options, three elbow patch templates, four sleeve cuff options to include thumb holes, an optional accent triangle on the side...endless combinations.  I personally like that because my daughter will find something she likes and request 10 of them in different colors. With this pattern I can have a little different twist on each top. 

My son, Ash, is crazy about all things boy.  He likes superheroes, cars, construction vehicles, getting dirty, breaking things...He is, however, very particular about his clothes so I let him pick out his own fabric.  He opted for a hood with folded over sleeves.   He did ask for pockets so that might be a future hack!  He landed on a two way race car knit that I got from Ozark Fabrics and some black and white checkered fabric that I bought from Sincerely Rylee.  It fit like a glove and was spot on for a size 5 ready to wear.

For my daughter's first shirt, I went with a Like A Girl panel from Zenith and Quasar.  It wasn't quite big enough so I did some blocking on it to make it the right size.  I also made her a pair of Little Birdy pants to go with the top.  The loose flared fit of the pants were a perfect match.  My daughter also doesn't like jeans so we decided on these as her comfy pants to wear with her new shirt.  For this top, she chose a standard neck and regular sleeves.  She's pretty tall so I had to extend the armscye to a size up (common problem with her shirts) but everything else was a standard size 7 which is her ready to wear size.  Again, spot on only better because we could fit the armscye for her frame.

The hooded shirt I made her was from a Liverpool that I got at Hancock's.  She shares my obsession with florals so this was going to happen as soon as she saw the fabric.  I wasn't sure on the Liverpool because it tends to have a little less give, but this was perfect for this tee...we also did thumb cuffs, and she now wants them on every tee she has so that's a win in my book!  I love thumb cuffs and these are so easy to make that I might just add them to all of our tee shirts!!  The instructions are extremely easy to follow along and even with the hood, gathered sleeves, and thumb cuffs, I was able to crank it out in about an hour.  The others were even quicker than that to make!


Nini and Ash were so completely ready to start their new adventures as first and second graders. They have adventurous spirits and a love for discovery, and I am so excited for what this year holds for them...even if they don't want me to walk them to class anymore.

So, as I was saying, I am just one of the stops on the Lulu & Celeste/Sprouting Jube Jube productions back to school tour.  There have been a lot of wonderful giveaways throughout the tour from our lovely sponsors and a lot of posts from fellow sewists who have been sharing their creations this week:
Check out this post from Lulu & Celeste to see what special sales are available during this tour! You can also head here to find out more about who is sharing their creations today!  Don't forget that you can also enter TODAY'S GIVEAWAY through this rafflecopter link.  Enter by August 29th at 11:59PM EDT, and you could win 1 PDF pattern from Big Little Patterns and 1 PDF pattern from Sofilantjes Patterns (*excludes bundles).

If you sewed up any back to school projects between the 1st of August through the 4th of September (when the link up closes) you can link them up and be eligible to win a pretty amazing grand prize package.  Just make sure you leave your email address so that you can be contacted if you win!  Here are the grand prize details:

3 yards of fabric from Mabel Madison
1 Tie Die Wire Headband, custome made to your size from 421 Myers Design Studio
1 PDF pattern of choice* from SisBoom
Nana's insulated totes PDF pattern from Sew Happily Ever After
1 PDF pattern of choice* from E+M Patterns
$15 gift card to BLAVERRY
(*excludes bundles)

Remember, don't miss out on the rest of today's tour stops:

If you would like to stop by the other stops on the tour, please follow the links below:

Day 1:  Call Ajaire * The Wholesome Mama * Sew and Tell Project * DIY Crush * Blaverry
Day 2: Phat Quarters * Mahlica Designs * Handmade Boy * Kaleidothought * The Berry Bunch
Day 3: Filles A Maman * Tales of a Tester * Sew Happily Ever After * 5 out of 4 Patterns * The Crafting Fiend * Lulu & Celeste
Day 4:  Create 3.5 * Sew Sophie Lyn * Sweeter Than Cupcakes * The Eli Monster * Paisley Roots
Day 5:  Cindy Parrett Blog * Sew Starly * Sew and Tell Project * Elegantine * Gracious Threads

And the complete tour of blogs here:

Friday, August 26, 2016

Just Emmy and me (Emmy Tee Shirt from Laela Jeyne Patterns


A few months ago, my daughter saw a top I had tested for Laela Jeyne Patterns.  Ever since then, she has been begging me to make one for her so when Marisa announced that the Emmy was ready for testing, SHE decided that I needed to apply to test so I was very excited that Marisa chose me to be part of her Emmy pattern testing team...I think the boo was maybe a little more excited, though!  She loves this shirt and wants one for every day of the week...or month.

Let's go over some pattern details real quick so you can see some specifics:

- Wide range of sizes: 6M-14 and unisex up to size 6
- Three neck options: standard, cowl, hood
- Two sleeve cap options: standard, gathered
- Three elbow patch templates
- Three cuff options: hemmed, banded, thumb cuff
- Three sleeve options: short, elbow, long
- Optional side seam triangle accent
- Layered printing
- Clear concised instructions with illustrations for those of us who like the visual references

So, really, this shirt is a great pattern that covers all types of style preferences!  My kids don't get excited about school clothes at the beginning of the year because their school has uniforms, but when they do get to wear "real" clothes, they always ask me to make something for them.  It was perfect timing that the Emmy is being released.  We're starting to see some cooler weather here, in the mornings at least, so I definitely see fall coming on soon for us!

I made my daughter two different tops for the test.  The first one was with a standard neck, standard sleeve.  I used a panel from the "Like a Girl" series that Lily Himrod ran at Zenith and Quasar.  It was just a teeny bit small for the size 7 so I colorblocked some black knit with it to make it big enough, and I kind of loved how it turned out.  Nini is pretty tall and sits in the 97th percentile for height so I used a size 8 armscye to give some extra ease in the armpits, but the rest of the shirt was spot on for a size 7 which is her ready to wear size.

My son, however, is in the 17th percentile for height so he's a short stack like me.  Thankfully, being super tiny is one of his favorite things about himself!  I was a little worried that the shirt would be a little long on him, but it was actually perfect length!  He's a size 5 in store bought clothes, and this fit perfectly on him!  I did cut this one straight across because I wasn't paying attention and cut into the bottom curve so this was my "salvage my mistake" mod.  He was so excited about getting a new shirt that he agonized over the fabric he wanted.  He finally settled on a race car knit that I got from Ozark Fabrics and a checkered flag knit from Sincerely Rylee.

Nini's second shirt HAD to have a hood.  AND it needed gathered sleeves and thumb holes.  AND, it HAD to be flowery.  She shares my obsession for florals...I had some liverpool that a friend picked up for me from Hancock's (so sad that I can't get more of this awesomeness), and when she saw it, that was the one she got stuck on.  The instructions are so easy to follow for the thumb cuffs that I seriously want to put thumb cuffs on EVERY shirt from now on!  These were all long sleeve shirts but I do intend to make some more of these in the other sleeve versions when the temperature starts climbing back up in the spring and summer...

Now, let's get you some info on how to get your copy of the Emmy T-shirt pattern and, if you want to make some Mommy and Me shirts, the Emily T-shirt pattern!  The Emmy is available right now at Marisa's webstore, and it is on sale right now for $6 (all single patterns are on sale for 30% as part of the last storewide sale that Marisa will be doing with a pattern release!).  This sale is good until the 29th of August.  There is also and Emily and Emmy bundle that you can get for $10.50 as part of the sale going on!!  There is also a Laela Jeyne Patterns Group on Facebook where you can keep up to date on Marisa's happenings and see what others have created using Laela Jeyne patterns.  It's also a great place to ask for help if you hit a bump!

This pattern really is perfect for every season, and with so many options, the possibilities are endless! So, don't miss out on the release sale and go grab your copy of this and the Emily today!!  Thanks so much for reading along!
We were a little done with photos by this point!  HA!

Blessings and Happy Sewing,
Kim

Thursday, August 18, 2016

A Very Sporty Summer (V-Neck Sports Jersey by Snuggle My Baby Patterns)


This was the summer of great adventures for my two littles.  They learned to ride their bikes without training wheels, learned to roller skate, made friends with the neighborhood kids, and learned what it means to paddle through the water and "not even touch the bottom!".  They climbed trees and came home with skinned knees.  They learned what it means when I say, if the street lamp is on, you're in the front yard...I grew up racing the setting sun so that I could make sure at least one toe was on the front yard by the time the street lamp came on or I have no idea what would have happened because I was too chicken to test it!  They both lived in athletic shorts, and my daughter decided she needed a matching shirt right about the time that Jenn Gunn from Snuggle My Baby Patterns announced her testing call for the V-Neck Sports Jersey.  Hello?!?  It was a sign from the sewing fairies that I was all in for this test, and I was so excited when I was chosen to be part of the test team.

Okay, so before I get too far into the summer recap, let's do some pattern specifics:

- Large size range to include teens (2T-16)
- Two shirt styles: color blocked or solid
- Two sleeve options: sleeveless or short sleeve
- Can be unlined, partially lined, or fully lined
- Unique v-neck finishing method (this made for a really crisp v on the neck when it was done!)
- Your usual concise pattern instructions and photos for those of us who use them for reference

We made two different types of shirts for the test.  My first run was with some performance knit that I got from JoAnn's, and it was a little tricky to work with the fabric.  Just had to move slow and focus. People used to call me magpie because I was easily distracted by shiny objects so focus and me...ehhh.  HOWEVER, the kids love these shirts and usually beeline it to them right after they come out of the wash.  I went a couple weeks where I didn't realize they were taking them from the basket as soon as they were coming out of the dryer so I thought they had fed them to the monsters under their bed...

My daughter is all about anything that has pink so her first top had hot pink and yellow.  It really is very hot pink, too!  I'm fairly certain that you would see this shirt from space.  She opted for the sleeveless on the first one.  My son prefers sleeveless shirts and actually asks me to butcher the sleeves off his all of his t-shirts so he can have a drawer full of tank tops so a sleeveless top was a no-brainer for him.  He went with a bright blue and red for his first top...again very bright.  Both tops fit the kids like a glove, and they weren't happy about taking them off at the end of the night.  My kids wear sizes 5 and 7 in ready to wear clothes, and these were spot on for RTW clothing.

For the second shirt, I actually ordered in athletic mesh from Denver Fabrics.  My daughter is a little more conservative so she asked that I line hers while my son opted to "let his muscles and chi chi's breathe" ...I don't ask anymore. It saves me stress if I don't ask...so his was unlined.  For these, I used mesh for everything to include the neck binding.  My son calls it his holey shirt and loves it because "the wind goes right through it, Momb"; a fact which happens to be pretty key here in OK during the summer months.

The v-neck seems a lot harder than it actually is.  I made this so tough for myself and ended up almost in tears when my machine ate the fabric and wouldn't cough it up.  Jenn made a video for us that shows us how she did it, and really. just. really.  It was so simple to do.  It just requires that you go slowly which isn't really my strong suit, but if you go slowly and take it easy, the process really does work. The final product really is a clean, crisp v-neck.  I even had a lady at Hobby Lobby ask me where I got the shirts because her daughter really needs some.  Hmm, I happen to know a lady who can make her some...

Now, if you've read this far, I sure do appreciate you for following along!  Let's get you some info on how you can get your copy of the V-Neck Sports Jersey!  The pattern was released this week and is available here at Jenn's webstore!  As an added bonus, Jenn also has some back to school bundles on sale, AND if you go to the Snuggle My Baby Patterns Facebook group she has a code you can use to get an additional 25% all patterns, including this one and the bundles!  Yeah, it's a pretty sweet deal...so head on over and join the group to get your sale code, then go to the webstore and stock up on this and the other really great patterns that Jenn has available!

Blessings and Happy Sewing,
Kim