Thursday, March 31, 2016

Headed to the Bahamas...tankini style


Every year, when the trees start budding leaves and the grass starts turning green, I start to dread the oncoming spring season...not just for the allergies that overtake our house, but that means that swimsuit season is right around the corner.  I usually take to the covers and vow that no bathing suit will be seen on me in public.  However, I do believe this is the year that I change that!  I decided that I was going to have an adventure and applied to test the Bahama Mama Peplum Tankini and Bottoms from Peek A Boo Patterns, and can I say I feel like a swimsuit queen in this suit!

Okay, so some quick details about the pattern before I give you my two cents on it:

- Pattern sizes range from XXS-XXXL (00-24) so this covers a pretty good range of sizes
- Top has options for a fitted or full skirt
- Built in shelf bra with optional cups (there's even a tutorial on the blog on how to use an old bra for extra support)
- Bottoms have a low rise and high rise option
- These are interchangable with the Bahama Mama boy shorts and tankini top from last year
- Colorblocked racerback style top so you can mix and match up colors

I opted for the full skirt and added the cups in the shelf bra for the top for some extra support and the wind gets going pretty good here in Oklahoma and that sometimes brings a little chill on the water so, um, well, um...yeah.

For the bottoms, I did make the high rise bottoms since I like to have that added coverage if the skirt happens to float up when we're in the water.  I was a little nervous about the rear coverage, and I was over the moon that I was well covered from behind as well as in my tummy area.

Overall, the construction was pretty easy.  I did add the cups to the shelf bra, and I would definitely suggest you try that on and make sure that the cups are in the right spot on your top before sewing them down.  If you are wanting to use an old bra instead, Eleri from the Sew and Tell Project, blogged a tutorial on how she did this for her swimsuit.  I didn't do this but hers turned out awesome so if you aren't wanting to mess with individual cups, I would definitely check out how she did it.

For me, the best part of this suit is how amazing I feel in it.  I'm 5'1" and after two littles, I'm a little more curvy than I remember so I've opted for the shorts and t-shirt option until now.  Every single photo I saw from the testers was amazing, and we were a group of widely varied shapes and sizes.  I don't think there was a single tester that didn't feel ready to hop in the water after sewing this up!  In fact, as you can see above, I did decide to at least step into the water, and OODELALLY, that water was COOOOLD!  My husband was my photographer that day, and he stood there and laughed at me while he continued to click the button....

Really, if you are looking for a great swimsuit that will fit you the way you want, I would recommend you take a look at the Bahama Mama Peplum Tankini.  The beauty of this one is that you can mix and match the pieces with the Bahama Mama Tankini and Boy Shorts from last year so really the possibilities are endless!

Now for the best part!  It released today (31 March) so you can grab your copy of each pattern on sale for Thrifty Thursday for today only! After today it goes to full price.  The pieces are sold separately so you can get one or both.  The top is available here and the bottoms are available here!  Amy also has a Facebook group that you can join in case you hit a head scratch at any point.  There are a lot of ladies in there who can help you out if Amy isn't available!

So, if you've read this far, I really appreciate you sticking it out with me!  I promise you won't be sorry you picked this pattern up so head on over and grab yours today!

Happy Sewing and Blessings!

Kim

Sunday, March 20, 2016

Every day can be an Easy Day!


With the start of spring, my littles are in full blown short sleeve mode, and the easy day tee from Snuggle My Baby Patterns really does make for an easy day when you're sewing it up!  My son has three of these already and is now trying to find out if I can cut his winter shirts up for this pattern! Hopefully, he doesn't start offering up his dad's shirts!!

So, as always, I like to give some pattern basics before I get into the pattern details.  For this one, here's a quick rundown:

- Sizes 2T-12 so this pattern covers a pretty large range of sizes
- Three sleeve options: short, 3/4, and long
- Two bottom hem options: regular or scooped
- Only three pattern pieces so very quick prep and sew
- Very clear concise directions and a lot of photos (for those of us who work better with pictures to go with the words)

Now for this one, the pattern calls for at least 50% stretch on the knit...make sure you verify that on your knit before you buy it or cut into it!  I learned the hard way on the Katie crop top that if you don't, you will have a funky fit for the shirt.  This one is designed to be pretty loose fitting so it's perfect for my two tree climbing, on the go kids.  They spent the day at their Grandpa Greg and Grandma Julie's collecting treasures and running around all over the yard with no issues at all!

I like that this one is a looser fit so that my nephew was able to have himself a shirt to hang out in. He's 12 and is very tall and wiry so it's hard to fit him with clothes, and this shirt was perfecto on him!  For my niece, I had a panel that I got from Zenith and Quasar, and I loved it so much for her...BUT it was a tad smaller than the pattern piece so I did some color blocking to make it fit.  This feature does NOT come as part of the pattern tutorial, but there are a bajillionty tutorials on Pinterest and YouTube to help you out if you decide you want to color block these!
I did also make a couple of shirts from upcycled adult shirts.  If you do this, be very careful about the print on the front.  I would even suggest you take the pattern pieces with you so that you can see if any design element will get cut off when you cut the shirts down to size.  I ended up using the front and backs from some XXL shirts for my son and daughter, but I did different fabric for the sleeves...still knit, though! I'd totally add photos of them if they weren't in the wash again.  They seem to be the going favorites at the moment so I don't even have a chance to fold them before they are zhoop, right out of the basket and back on the kiddos.  I guess that's better than the standard which is clothing optional when in the house! (Not this mom's preference, for the record)

These shirts came together so fast that I can't even tell you...I think it took longer to pick out the fabric and piece together the pattern than it did to sew them.  I did all four shirts in an afternoon...I'd say about 45 minutes a shirt, and it only took that long because I had Downton Abbey on the telly so I kept stopping to stare at the screen.

If you need a quick and easy tee for your littles (or not so littles) as the weather starts to give promise of warmer days to come, this is the perfect pattern for you! AND, to celebrate the release of this pattern, you can grab it for $5 from now until the 28th of March!  It will only be on sale at Jennifer's Etsy store for a limited time, though, so don't miss out!  Also, you can hop on her FB group to keep up with her happenings at Snuggle My Baby patterns or to ask questions if you hit a head scratch while working with her patterns!

If you've read this far, thanks so much for sticking it out with me!  Don't forget, the Easy Day Tee pattern is on sale right now so hop on over and get your copy!  Thanks again for reading along and Blessings!

Happy sewing,
Kim

Thursday, March 10, 2016

Headed to Dakota


North or South, East or West...doesn't matter.  We're talking blazers here.   Specifically, we're talking about the Dakota from Laela Jeyne Patterns!  This blazer is amazing.  I am usually not terribly excited about blazers in general because they never fit right on the arms, and if they fit right on the arms the rest of it is big.  However, this blazer is the bomb-diggity!  I didn't have to alter the pattern in any way, and everything fit perfectly!

Alrighty, I like to start with a few basics about the pattern: 
- Pattern ranges from XS to XXL so it covers a wide range of sizes
- There are 3 sleeve options: long, 3/4, and short
- Options for scalloped or straight cuff
- Options for hi-lo front and back or straight back
- Fully lined
- The design makes this suitable for maternity wear
- The instructions are very concise and straightforward.  There are also tons of photo and illustrations for those of us who do better with the visuals.  


As far as the pattern, it was very easy to follow along.  I read it a few times through to make sure that I understood everything.  I would recommend this pattern to someone with a bit of experience with sewing.  There are areas where you will have front and back darts and there is a little trick to lining the arms to make sure they don't end up wonky so I did read that a few times.  I did find the part where I connect the neck seams a bit tricky so I would highly recommend looking at the directions and asking questions in Marisa's FB group if you hit a head scratch.

I needed blazers for a business convention that I'm going to in a few weeks so I made two of these. My first one was a suiting material, and my second one was a cotton woven Tardis material that I had purchased a couple of months ago.  I absolutely will be wearing that during one of the convention days...I caution you to definitely press your pieces as you sew and make the lining first so you can try that on for fit as I know that the different materials sat differently for me so it was essential to have the lining right.  Don't skip the pressing part whatever you do.

I found this blazer to be really forgiving on the fit.  I usually struggle with either the sleeves or the main fit.  I have so many issues with proper fit, and this blazer fit me from the get-go.  I did the hi-lo option for mine, and I really loved that the back came down and covered my tush.  I slipped these on, and I'm pretty sure the theme song to "Rocky" started playing in the background.


AND, the best news of all, Marisa is offering the pattern at a special release price!  You can grab your copy of the pattern for $6.50 from now until March 14th!  After that, it goes up to the regular price of $9.

You can also shop all of Marisa's patterns at her Laela Jeyne Patterns webstore!  Remember, the Dakota blazer is on sale for a limited time to celebrate the release of this have to have pattern!


If you want to skip on over to the Facebook group, you can find it here.  Marisa posts all of her happenings here so you won't miss out on new releases or special events!  


Now, if you've read this far, then I really do appreciate you for sticking with me!  Now head on over and pick up your copy of the Dakota!

Happy Sewing,
Kim


Wednesday, March 2, 2016

Kicking it with Katie

I love this panel that we got from Zenith and Quasar!

When the tester call came for the Katie Crop Top, I told myself, “Do NOT apply.  You do NOT have time!”  BUT, sometimes, you just know in your gut that you need to do something.  That’s what happened with Katie’s crop top sweater. I found myself telling Jennifer that I would love to test this pattern…even though I told myself not to.  And I am so, so glad that I did.  This pattern is amazingly fast to sew and so versatile that I see myself making these year round. 
 
This was one of the ones that I made with too little stretch.
Still awesome looking but a squeeze to get on.
As always, I like to give you some basics up front about the pattern:
- Pattern ranges from 2T to 12 (which makes me happy as my little bug is nearing the very top of the size range for a lot of the patterns I have)
- Only three pattern pieces to cut so very quick prep
- Can be used with a variety of knits to cover all four seasons!
- No buttons and zippers so my girl can put this one on and off on her own with no muss and no fuss.
- As with all of Jennifer’s patterns, the instructions are very concise and straightforward.  There are also tons of pictures for those of us who do better with the visuals. 


As far as the pattern, it was extremely easy to follow along, and I really do think this is a great pattern for anyone wanting to delve into the world of knits.  It really is a happy place to be, and knit sometimes gets a bad rap…My daughter was loving the crop part because she could “show off her fashion underneath, too”…
 
Another one with too little stretch but we made it work!
I will caution you that you really do want to check the stretch on your knit to make sure it has at least 50% stretch.  For those who are wondering what that means, here’s a quick example:  I cut a 6” piece of fabric and stretch it.  I measure how far it stretches.   The equation to figure out the stretch is:

Amount past the original size the fabric stretched / original length = % stretch.

So for the 6” piece, if it stretches to 9” then it stretched 3” past the original length so:

3/6 = .5 (multiply this by 100 and you get 50%). 
 
Did I confuse you completely?  I hope not. :/!

SO, as I was saying, you want to get something that is at least 50% stretch.  VERY IMPORTANT!!  I didn’t do that with the first ones I made, and it was a fight and a half to get that over the girls’ heads.  We did it, but they looked like something out of Total Recall as I was pulling it on them.  As long as you have the right stretch fabric, you will be golden as far as the neck fit.  As far as the overall fit, I found it to be true to RTW.  Little Miss wears a size 6 RTW, and I made this in a size 6.  Same with my niece.  She is a size 9 and perfection…


All in all, we really do love Katie a lot here, and I am already envisioning some more for the upcoming spring weather! Now for the best news...It’s on sale for a special release price at Jennifer’s shop starting today!  You can get your copy of Katie’s for $5.  After that, it goes up to $7.95.

Grab your copy of Katie’s here at her Snuggle My Baby Patterns Etsy shop!  Remember, the Katie’s Crop Top Sweater is on sale for a limited time only to celebrate the release of this simple but very versatile pattern!  

If you want to skip on over to the Facebook group, you can find it here.  Jennifer posts all of her happenings here so you won't miss out on new releases or special events!  

Now, if you've read this far, then I really do appreciate you for sticking with me!  Now head on over and pick up your copy of the Katie’s today!

Happy Sewing,
Kim


Monday, February 22, 2016

Just hanging around with Emily


So, I hate to go clothes shopping...and I hate to do laundry.  I might hate to do laundry just a little more than I hate clothes shopping.  So, when Marisa posted that she was doing a tester call for her new Emily Tee, I was all over that like bees on honey!  I was a little worried about it being something for me because I have a love hate relationship with sewing tops for myself (I usually have to frankenpattern to make things fit all my bits right), but this...this top was perfection!  I seriously want to make 30 of these so I have a whole month's worth that I can live in.


Okay so some basics about the pattern first:
- Pattern ranges from XS to XXL so it covers a large size range.
- There are 3 sleeve options: long, elbow, and short.
- The neckline has 4 options: hoodie, cowl, scoop neck, and jewel neck.
- You can opt for a triangle inset on the side seam or just leave it as a whole piece.
- There are elbow patches for the long sleeve option!  I loved these and was trying to find a way to incorporate them into the long sleeve tee that I did...so sad that I couldn't so I guess I just have to make another one.
- Maternity add-on pack available!
- The instructions are very concise and straightforward.  There are also tons of pictures for those of us who do better with the visuals.  

As far as the pattern, I had no problems with following along.  I did read it a couple of times to make sure I knew what to do.  I actually read the thumb hole part a few more times because I had never made actual thumb holes before, and after I got started, it was REALLY easy.  I seriously want to put them on all of my long sleeve shirts now.  Those thumbholes and the cowl neck are my favorite parts of this shirt!!  I made my first top in a burnout sweater fabric that I have been hoarding forever now, and it was perfect for this top.

I also did a second shirt in the short sleeve version so that I had a top to wear to the KidFest here in Oklahoma City.  It took about 45 minutes from start to finish, and I had a top that fit me so perfectly that I didn't even worry once about it all day.  This pattern fit me everywhere, even my arms which usually need some readjusting.  

Again, as far as the fit, I found it to be pretty true to RTW.  I didn't have any issues with the bottom riding up or the sleeves being too tight.  It's kind of a close fit cut on me, but not so close that I was self conscious at all.   The pieces sewed together like a breeze.  Everything lined up perfectly, and it was a very quick sew.

AND, the best news of all, Marisa is offering the pattern at a special release price!  You can grab your copy of the pattern for $6 (maternity add on on sale for $2) from now until February 26th!

Shop Laela Jeyne Patterns here at her webstore!  Remember, the Emily T-shirt is on sale for a limited time to celebrate the release of this have to have pattern!  

If you want to skip on over to the Facebook group, you can find it here.  Marisa posts all of her happenings here so you won't miss out on new releases or special events!  

Now, if you've read this far, then I really do appreciate you for sticking with me!  Now head on over and pick up your copy of the Emily!

Happy Sewing,
Kim


Friday, February 12, 2016

In the Hampton's with Jack and Jackie


All smiles!!  These are the standard sleeves
on Bug and flutter sleeves on Boo.

Okay, okay, so maybe it's not Hampton's.  And maybe aren't hanging with anyone from the Kennedy family...BUT, this shirt is still a whole lot of happiness all on its own. It's such a rare occasion that my kids want to wear something that I've made that I have to (not so secretly) celebrate when they BOTH agree to wear something "mama made"...Wellll, let me tell ya, the Jack and Jackie top that I recently had the good fortune to test for Snuggle My Baby Patterns is one such pattern.  This pattern was absolutely perfect for my littles since my daughter is quickly growing away from ruffles and bows (TRAGEDY for me because in my world everything is better with a bow!!!) and little bug could have a shirt to match sissy.
See what I did there?  We're not above bribery
to get a photoshoot going on!

So, first things first, pattern details:
- Pattern ranges from 2T-12 so there's a lot of room to grow with this one!
- There are three sleeve options: long, short, and flutter
- There are two sizing options: regular or slim
- There are no buttons or zippers to work with so super duper easy there!
- The instructions are very concise and easy to follow along with, and if you're a visual learner like me, there are a lot of photos along the way to show us what we need to do!
- The pattern itself is really easy to sew together and is a really quick sew.  I was able to get 4 shirts done in a day!
At this point I was informed that
I should have done long sleeves
Like I said, the pattern is so easy to follow.  I read it once through before cutting anything to make sure I understood the instructions, and we were off and running!  Construction came together like a breeze, and I had no issues at all with the pieces lining up.   The top slips over the head so there aren't any fasteners for little hands to work through.  My kids picked out some British Invasion from Riley Blake and had to match so they could be twinsies so I made them both the same top with different sleeves.  I also made a Spiderman one for my son's best friend and a long sleeved version for a special little girl we know!
Bribery again!  She would only stand still because
I promised her cheese sticks.
As for the fit, it was true to ready to wear sizing.  There's plenty of room in the top that the kiddos can climb and jump around, but the shirt itself doesn't appear to be swallowing them up when they are wearing it!  Spiderman informed me that he would much rather have had the long sleeves as that would hide his web blasters much better, but he would make it work!  I thought that was pretty benevolent of him. :)!

All in all, all four of the kiddos loved this shirt, and I've been asked if there is any way that all of their friends can have shirts so they can all match.  At this rate, it might be summer by the time I get them done so I'm thankful this is a quick and easy pattern!  It's on sale right now until February 19!  You can grab it at a special release price of $5!  After that, it goes up to the usual price of $7.95 so don't miss out!

The pattern is available at the Snuggle My Baby Patterns Etsy store!  Jennifer also has a group on Facebook that you can join to keep up with her happenings, apply for test calls, and ask for help on patterns!
Still bribing him!  This time we had to add some
Umi Zoomi to sweeten the deal!
If you've made it this far, I appreciate you hanging in there with me!  Go grab your copy of Jack and Jackie's and sew your little love some of these tops!!

Happy Sewing,
Kim

Tuesday, January 26, 2016

Bella of the Ball

Sometimes, you get the opportunity to try something out, and it turns into an instant love!  That was how it went with the Bella Party or Play Dress from Snuggle My Baby Patterns.  I was testing the tulle skirt version the first shot out the gate, and I’ll admit, I was a little worried about the tulle.  We usually aren’t besties, but oh my, was it amazing on this dress! 

Okay so some basics about the pattern first:
- Pattern ranges from 2T to 16 so it covers a very large size range.
- There are 4 dress options: long tulle, short tulle, special occasion fabrics, and play dress
- The bodice has options for long sleeve, short sleeve, or no sleeve.  All seams are enclosed so you won’t have any seams showing when complete (except where you sew the sleeves on…)
- There are pattern pieces for the bodice and measurement charts for the skirt pieces and sleeve cuffs so that we can save our paper and ink.
- The bodice closes with 3 buttons so NO zippers!
- The instructions are very concise and straightforward.  There are also tons of pictures for those of us who do better with the visuals.  Jennifer also made a video on how to attach the tulle in case that parts sticks us up.

As far as the pattern, I had no problems with following along.  I read it a couple of times before I got started to make sure I understood what I was doing.  My favorite part of the dress has to be the bodice.  It closes using buttons and has a sweet little curve in the back that is really unique.  My daughter was over the moon over the twirl factor.  When we went to raid my stash for fabric, she opted for a long tulle skirt and….um, ninja fabric.  I wasn’t terribly excited about her choice until it came together, and it was love! 

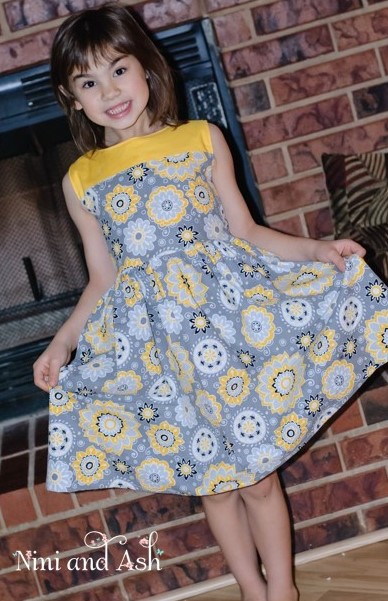
I also did a second dress in the play dress version that my little could wear to church (they wear uniforms for school which made me uber sad that she won’t be wearing this to school, but it’s all good). This time momma got to pick the fabrics so we went with some gray floral that I’ve been hoarding for a while.  It was a pretty awesome Hobby Lobby find and was perfect for this dress with some yellow solid that I had picked up from Ozark Fabrics on Facebook. 

As far as the fit, I found it to be true to RTW.  Little Miss wears a size 6 RTW, and I made this dress in a size 6.  It fit her perfectly!  The bodice is slightly form fitting, but there was still plenty of room for my ninja princess to wage war on the skeleton army (i.e. her brother).  The skirt was definitely roomy enough that she could chase her brother around the yard and play in it.  Even a ninja princess needs to be able to play, right?

I made my own buttons for the bodice using the button covers that you can get a JoAnn’s or Hobby Lobby.  It’s really easy to do that with this pattern because you don’t sew button holes.  The pattern calls for elastic loops so you can use pretty much any type of button you want.

All in all, we really do love our Bella around here, and I see many more of these in our future!  Now for the best part!  It’s going to be on sale for a special release price at Jennifer’s shop from today through Sunday, 31 January!  You can get your copy of Bella for $5.  After that, it goes up to $7.95.
So just head to Snuggle My Baby Patterns or visit Jennifer’s etsy shop!  Also, Jennifer has a facebook page where you can follow her happenings:

Shop Snuggle My Baby Patterns here at her webstore or here at her Etsy shop!  Remember, the Bella Party or Play Dress is on sale for a limited time to celebrate the release of this amazingly versatile pattern!  

If you want to skip on over to the Facebook group, you can find it here.  Jennifer posts all of her happenings here so you won't miss out on new releases or special events!  

Now, if you've read this far, then I really do appreciate your for sticking with me!  Now head on over and pick up your copy of the Bella!

Happy Sewing,
Kim