Wednesday, June 28, 2017

Summer Sewing with Laela Jeyne (Summer 2017 Collection)


Laela Jeyne Patterns just released The Summer 2017 Collection, Marisa's first pattern collection, and I am seriously in love with every single piece. With the kids home all summer long, 7 days a week, 24 hours a day, easy to make and easy to wear clothes are always near and dear to my heart.  There are six patterns in total, and I am super excited that I can make myself some staple summer pieces. I'll be ready for pretty much anything from hanging out at the zoo to a treasured date night.  I'll even have something for the lake if we get that far this summer!

Okay, so what's in the collection??  Like I said, there are six patterns that you can either buy separately or build you own bundle.  All of the patterns are on sale right now so this is a great time to get some amazing patterns as some righteous prices (food for thought:  if you buy the entire collection right now, the sale price is 40% off the retail price of the bundle).  I'm going to run through each pattern and give you my take on them.  The entire collection includes the Women's Dahlia Tank Top, the Women's Lily Woven Blouse, the Women's Rose Circle Skirt, the Girl's Rosie Circle Skirt, the Women's Violet Swimsuit, and the Girl's Vi-Vi Swimsuit

Dahlia Tank Top

I would definitely say this is a beginner pattern; it's a very fast sew and is perfect for anyone wanting to try out sewing with knits.  It was a little more form fitting that what I usually wear, but I have to say, I love it!  It is so comfortable, and I used a double brushed poly knit from Knitpop so it was so very soft.  I really loved that there were different cup sizes so I didn't have to wonder if I needed to adjust down for a good fit!


I made the hip length for this one.  I'm not quite brave enough for anything shorter yet, but there is a short option if you prefer that.  I really loved the length on me, and the bindings on the neck made for a cleaner finish that was more comfortable for me than a neckband.  The Dahlia is such a versatile top that you can easily pair with jeans for everyday wear or with a skirt/slacks to dress it up.  One blogger even made one in stretch velour!!

Lily Woven Blouse

Oh, how I love this blouse!  I made mine in a very lightweight woven from Sincerely Rylee, and it was so amazingly cool and breezy.  I also opted for a lace zipper that was a smidge longer than the pattern called for so I did have to mod the zipper lines to make sure I had the zipper in the right place.


The Lily comes with the option of an A-line silhouette or a gathered front.  I went with the A-line sleeveless option.  I am so happy with how the A-line turned out, and I wasn't quite so self-conscious while I was wearing it around!

My favorite  part of the top has to be the front darts.  They pull the bust in a bit and made me feel elegant.  My husband kept telling me to put that one top back on after I changed into PJs because he loved how this one turned out.  He very rarely pays attention to my clothes so snaps to Marisa for this one!  I paired this with a pencil skirt I made a few months ago, and suddenly, I was wishing we were on our way to date night.  HA!

This one took a little longer to make because of the blouse's structure.  DON'T let that scare you, though!  Marisa walks through every step of construction in great detail so you can get everything put together.  I would definitely suggest some familiarity with darts and zippers, though.  It took me about an hour and a half to make the Lily, but the end result is so amazing that it makes it completely worth taking the extra time to get it right!

Women's Rose and Girl's Rosie Circle Skirt

Both of these are amazingly fast and easy to sew up. My daughter has been learning to sew and use the Rosie to make her first clothing item!  For hers, we chose a performance knit for the waistband, and it was perfect (if you want to use a woven fabric, there are also instructions to make a woven waistband).  The recovery on the performance knit was sturdy enough that Nay didn't feel like she was fighting to keep her skirt on, and she's loving the twirl factor on it.


There are three silhouettes for this pattern: quarter, half, and full skirt.  Nay wanted the half circle, and I went with a quarter circle.  We both went with the knee length, because, again, it gets HOT here.  You can also choose a maxi length if you are looking for something longer.


My Rose is a lightweight sweater knit from a mystery box from Sincerely Rylee, and it came out super comfy.  I used the same fabric for the waist, and I think I'm going to go back and change that to something a little sturdier.  I wasn't thinking right when I put that on there, and I definitely feel like I need something more to support the weight of the skirt.  I really love that my skirt is a little more streamlined because it doesn't accentuate parts of me that I don't want to highlight.  Here, I paired it with the Dahlia, and it was a perfect combo!

Violet and Vi Vi Swimsuits


Swimsuit shopping is the bane of my existence.  Nay acts like I'm driving us to our deaths so I was super stoked to see that swimwear is part of the collection.  It was perfect timing because the kids were headed to camp, and Nay needed a one piece.  Apparently, one piece suits are harder to find than the Holy Grail because we found nothing after four stores.  I made her a size 7 and added 1" to the length.  Turned out perfect!  I also made her version fully lined with the side cutouts because they were cute.  We decided to skip the ruffles on the top, but that is an option for both the Violet and Vi Vi.


The kids pretty much live in their swimsuits right now so the Vi Vi has seen a lot of love, and I am absolutely digging the crossover in front.  In looking at other photos, I think I somehow managed to get it turned around the opposite way?!?


For my Violet, I added the built in bra as well as the full lining.  I really appreciate the built in because the water is kind of cold when you first get in, and, um, yeah...My version was just a plain one piece, no ruffles, no cutouts.  I did do a low back on mine while Nay wanted the higher back for hers.  I was also a little worried about creepage, but the neighbors are happy to report that my bum stayed fully covered the whole time that I was in the yard with the kids!


Of all the pieces in the collection, these took the longest to make (mostly because I messed up a couple of times and swim wear is a booger to unpick), but man, that fit is so worth it in the end.  I can't even get CLOSE to this kind of fit on my store bought suits!


As I said in the beginning, I seriously love every piece of this collection, and I am so excited to have some go to patterns for my summer wardrobe.  Thanks so much for stopping by as we continue with the Laela Jeyne Summer Collection Tour!  There are a lot of talented ladies sharing their creations with us this week so please stop by and show them some love.  Laela Jeyne is also having a giveaway on her blog where you can win two patterns of your choice from the summer collection!  Just head on over to the Laela Jeyne blog and take a look at the daily roundup posts to see who's coming up each day and to get to the Rafflecopter link to enter the drawing!  Here's a look at who's already shared their makes and who's on deck over the next few days!

Monday
Tuesday
Wednesday
Thursday
Friday

Summer of Swim (Lulu and Celeste, Sprouting Jube Jube Swimsuit Edition)


This is the summer of swim for my two water bugs.  They literally get up, eat breakfast, and roll out into the backyard to play in the pool.  It doesn’t even matter what time it is.  I realized last month that they have both grown to the point that they don’t have any suits that fit them anymore, and my daughter HATES store bought swimsuits.  It was right about this time that Snuggle My Baby Patterns released the Sunny Day Swimsuit (I did receive the pattern free from Jen Gunn as part of the testing group).  It’s a two piece but still extremely modest, which was perfect for Nay because she’s so very conservative (I’m going to encourage that for as long as possible, to be honest).   Just about this same time, Deb Zaleski posted a call for the swimwear blog tour!  It was like the sewing fairies were lining the stars up just right so I threw my name in the hat to join the tour! 

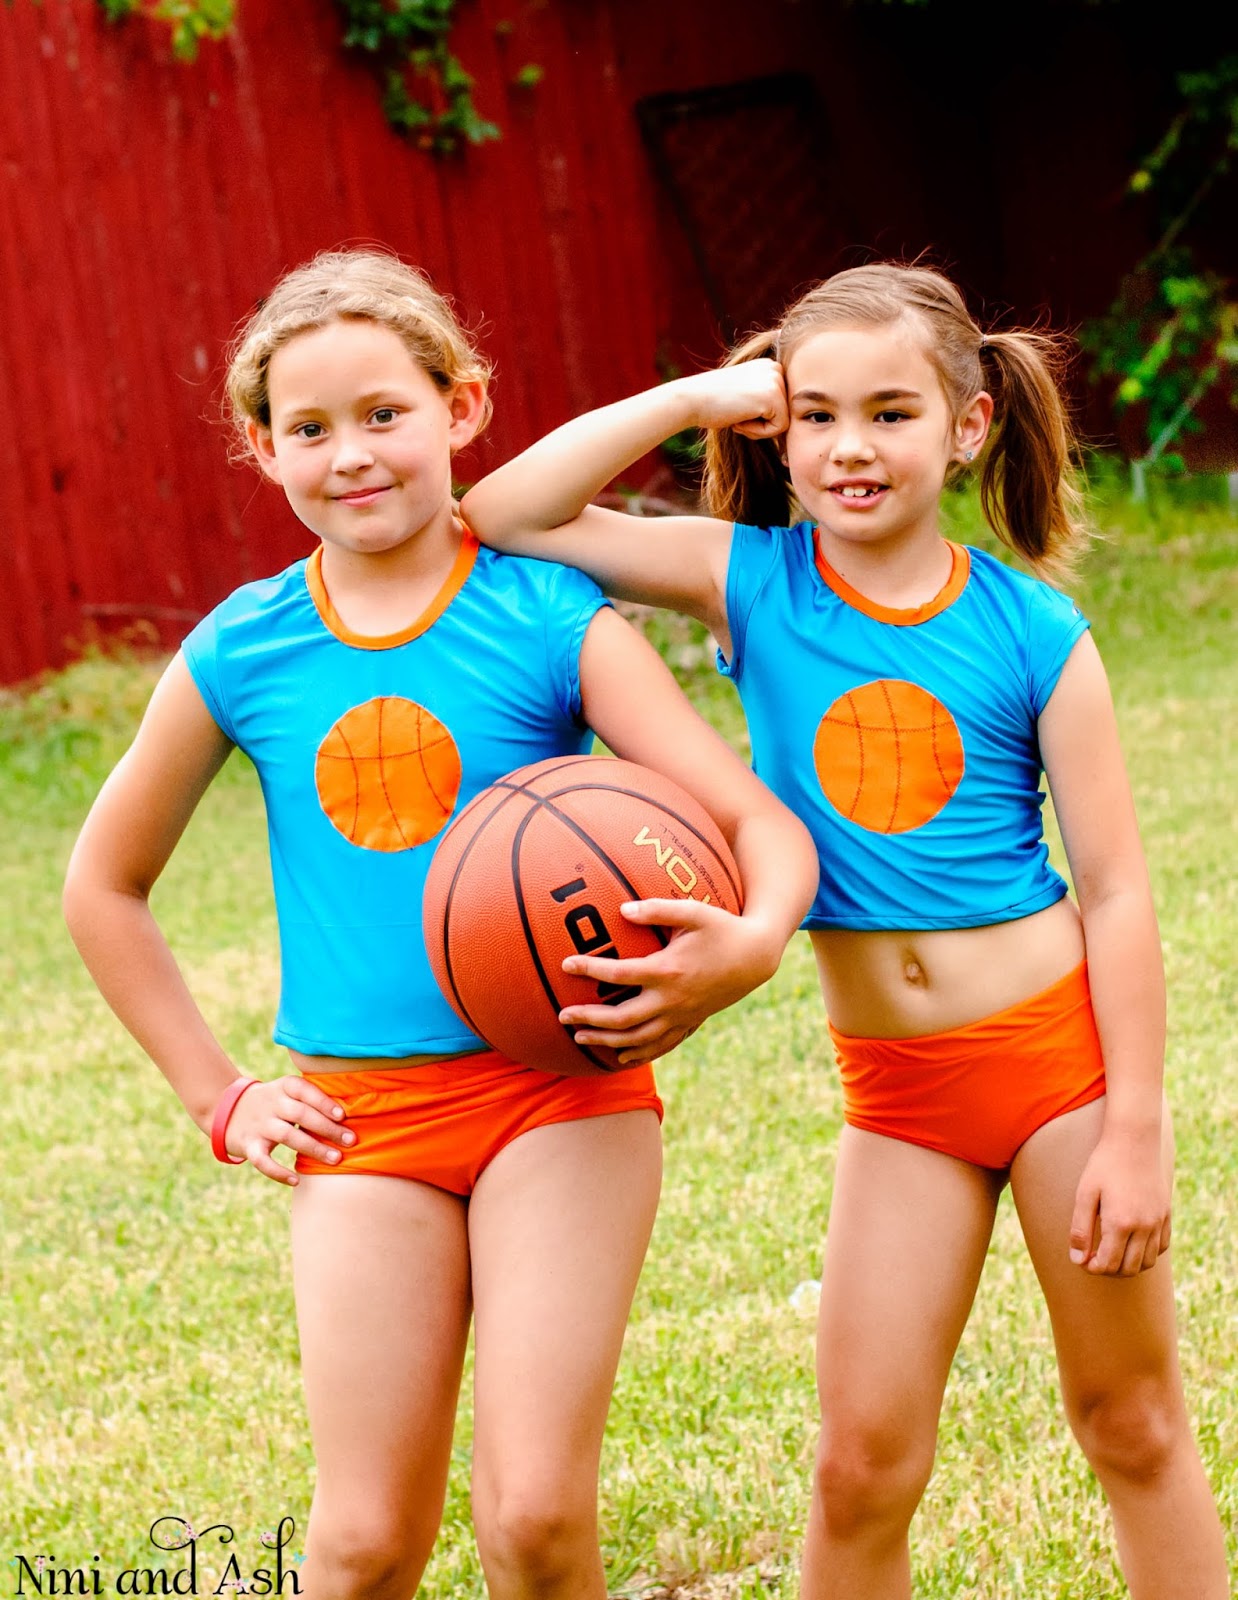
We live in Oklahoma, and summers are VERY HOT…I’ve seriously considered climbing in the freezer a few times to get away from the heat.  We also live in Thunder country, and both my niece and my daughter are crazy for anything Thunder.  When I took them to the store to pick out some swim fabrics, they both immediately beelined it to the orange and blue so Thunder suits it was!


The Sunny Day Swimsuit is such a great pattern because it offers the ease of a two piece while still covering up and keeping everything modest.  The front of the top and the bottoms are lined so that there’s no worry about seethroughedness (real word…I’m vouching for it!) when the suit gets wet. 
I was pretty excited that this pattern ranges from 2T to 16 so I’ll get a lot of mileage from this one.  Nay is starting to hit the top of the size range for a lot of the patterns that I have for her so I’m always looking for some that will give me a little bit more use as she continues to grow up despite my attempts to stop the process.

I was a little worried when the girls started playing that they would get some creepage going on in the back, but there was solid coverage that stayed in place even while they were running around the yard.  I added the basketball appliques to the front of the shirt to add a little fun to their suits (this is not part of the pattern). 

As far as the pattern goes, I would definitely say this is an advanced beginner pattern due to the swim fabric and the lining.  I think that an adventurous beginner could give it a go and do fine, but there might be a bit of trial and error with working with swim fabric.  I really loved that this pattern includes layering so that I could only print the sizes that I needed/wanted.  There were also photos for every step of the tutorial so that I could see what my suit SHOULD look like and catch anything that looked like it might  be off before it became disastrous. 

This was a very quick sew.  I made four suits in two days, and I was able to add a little bit of fun to them with relatively no major work.  After she got her Thunder suit, my daughter asked for a Star Trek suit (gold because that’s what the bosses wear. HA!) and a red Power Ranger suit.  Challenge accepted so I made her a couple more.


My son was a bit put out that I didn't make him a suit so I snuck a quick sew in for him as well and made him the Dominic's Board Shorts, also from Snuggle My Baby Patterns.  This pattern ranges from 2T-12 so, again, there's a large range of sizes!  I used board short fabric for this pair, but I've also used Dominic's to make regular shorts as well.  My son loves anything with pockets so he has a place to stuff his treasures so these work well as regular shorts.  This is another very quick sew, and it also includes photos for every step of the tutorial.  It's a little bit of an earlier pattern, and it was released prior to Jen's move to layered patterns.  There aren't very many pages for the entire pattern so it's not really a show stopper.  The pieces are also nested so you can still go through and cut the sizes you need pretty easily.  My son couldn't give a toot about themed swim gear so he picked out some skull and cross bones for his shorts.  I've had it in my stash for ages, and he finally decided this year that he wants to use it so I'm happy to oblige!


Alright, so as with all of the LL&C, SJJ tours, there are some awesome prizes and contests going on so let's get some info out there for you to get entered into some prize drawings!

Today's Rafflecopter giveaway prize pack is a PDF pattern of choice from Gracious Threads and a $50 (USD) gift card from Raspberry Creek Fabrics.  You just need to click the link below to get yourself entered for the daily drawing:

a Rafflecopter giveaway

There's also a grand prize giveaway that you can enter!  This is a pretty sweet prize pack as well: a $25 (USD) gift card to Phat Quarters, a $100 (AUD) gift card to Boo! Designs, a $20 (USD) gift card to Simply By Ti, AND the PDF swim bundle from Made By Jack's Mum (this is four patterns total):

a Rafflecopter giveaway

You can also enter the grand prize drawing by joining the Instagram contest!  This is the first time LL&C, SJJ has done this type of contest, and it's a great way to join in and share some of your own swim creations!  Here's how you can join in on Instagram:

1.  Post your own creation on your Instagram account and use the hashtag #TheSwimsuitEditionTour.  Also make sure to tag @luluandceleste and @deborahzaleski
2. REPOST the contest pic: Swimsuit Edition Contest Pic

AND for an extra entry, tag @phatquarters, @simplybyti, @boodesigns_kristie, and @madebyjacksmum on the pic of your creation!

If you do decide to join the Instagram contest, please take note of the following:

- Mark the photo public so that everyone can see your photos
- Make sure you share your photo on IG between June 26, 2017 at 12AM EST and July 2, 2017 at 1159PM EST only
- You must have sewn your suit in the month of June 2017.
- Can be any swimming item you WEAR...men, women, children, swimsuits, caps, coverups
- Can be something you've shared before (as long as it was sewn in June), but you need to repost it during the week of the contest with the hashtags and tags.
- Does not need to be modeled.  You can post photos of flats if you prefer.

**The contest is in no way sponsored, endorsed or associated with Instagram.  By entering, you are confirming you are 13 years of age or older, release IG of any responsibility, and agree to IG's terms of usage.

All contests are open worldwide.  Please note when redeeming your fabric gift certificates that you are responsible for any purchase amount above the amount of the certificate, to include shipping costs.  You are also responsible for customs/duty fees as applicable to your country of residence.

Now there are a lot of stops on this tour, so be sure to check out the other bloggers and see what wondermousness (another real word...) everyone has sewn up for the tour.  There are some pretty amazing creations out there that you can read about:

Monday, June 26

Tuesday, June 27

Wednesday, June 28

Thursday, June 29

Friday, June 30

Finally, thanks so much to the sponsors who provided prizes for some awesome giveaways and for providing patterns to bloggers on this tour!  Please take some time to show them some love as you are visiting some of the stops along the tour!

Thanks so much for reading along!  I can't wait to see your creations on the Instagram contest!  

Blessings and Happy Sewing,
Kim

Saturday, May 27, 2017

No weeping for this Willow (Willow Dress and Tunic from Petite Stitchery and Co.)

My daughter has finally grown out of ruffles and ribbons so I am constantly looking for patterns that she is willing to wear, especially when it comes to dresses!  When Deb Zaleski from Lulu and Celeste, Sprouting Jube Jube Productions asked if any of us had tried out Petite Stitchery and Co, I got a little excited.  Was it possible there was a designer out there that I hadn’t tried yet??  Surprisingly, I had NOT tried any of their patterns, and after looking at their catalog, I still don’t know if I could pick a favorite.  I finally landed on the Willow Dress and Tunic (DISCLAIMER: I was provided the pattern free by Petite Stitchery and Co. but my thoughts are my own.)


Let’s go over some quick pattern details before I get too far along:
- Large size range: 2T through 12 (I appreciate this since my daughter is going to be topping out on the size range of many patterns I own)
- Rated as a beginner pattern
- Two length options: tunic or dress
- Three sleeve options: long, 3/4, and short
- Two neck options: simple or tie closure
- Layered pattern pieces so you only print what you want/need


Based on the measurements, my daughter was a size 7.  The sizing for this was spot on for ready to wear, and the fit was perfect on her.  We urgh’ed and argh’ed over fabric for a hot minute and finally landed on a drapey black with pink medallions.  I tried to talk her into a second color for contrast, but Nay was having none of it so we ended up doing the whole dress in the same fabric.  The pattern itself has panels in the back so it lends itself to colorblocking or an overlay on the back. 


We also opted for the ¾ length sleeve.  That’s usually the standard when I ask Nay what length she wants.  The ¾ length is almost perfect for us right now.  It’s the end of May, and the temperature was almost up to 100 degrees today.  Like I stated above, there are also two other sleeve options you can choose from.  You can also choose to add a sleeve cuff, elastic, or standard hem.  Nay chose the standard hem on her sleeves.  I also chose to do a simple finish on the neck due to my daughter’s sensitivities with things against her neck.


I really love the fabric for this dress.  The drape gives the dress such a dreamy feel.  The pattern calls for lightweight fabrics like cotton lawn or voile.  I wish I would have paid attention to what this fabric is when I bought it from SincerelyRylee a couple of months ago.  It was perfect for this pattern and sort of just flowed when Nay put the dress on.  There are also tips in the pattern on how to make fabrics less sheer if you have a somewhat see through fabric that you want to use for the dress.


The pattern is rated as a beginner pattern, and I do wholeheartedly agree with that!  If you know how to gather fabric, that’s the most difficult part of construction.  I think this dress came together in about 2 hours for me, so it was a relatively quick sew.  The tutorial was very well written with clear, concise instructions and photos for each step so you can compare your steps with what it should look like during the process. 


Overall, I loved the pattern and was very pleased with how easy it was to follow along.  I am so excited to have a new company that I can get patterns from as my little becomes not so little.  You can check out the Willow and all of the other patterns in the Petite Stitchery and Co. lineup at their webstore: Petite Stitchery and Co.  You can also follow all of the designer’s happenings by following their Facebook page: Petite Stitchery and Co FB.


Thanks so much for following along!  Now, go check out some of the amazing patterns at Petite Stitchery and Co, and sew yourself up some love!

Thanks again and Happy Sewing,

Kim

Thursday, April 27, 2017

Happily Ever After...(JenLee Fairy Tale Dress from Snuggle My Baby Patterns)

Oh, mylanta!  I don't know where to even START with how epic the JenLee Fairy Tale dress is.  I cajoled my daughter into wanting not one, but TWO of these dresses.  She begrudgingly agreed to model these dresses and told me she doesn't have to like it, but whaddaya know, she LOVES them.   My heart is full...ha!  I'm not sure what's not to love about this dress...seriously.  It's ahhhmazing!

Alright, so what do you need to know before I start raving again?  Lemme tell you about this pattern:

- Size ranges from 2T to 12
- Unique back bodice straps
- Draped tulle skirt (so no gathering of the tulle)
- Layered pattern pieces
- Photos for every step of the tutorial (I use these pretty extensively since I'm a visual learner)
- Clear, concise directions for each step

So, I made two dresses for the test.  The first one started out as a steampunk style dress but kind of turned into a steampunk/romantic floral type dress.  I did add the non functional straps and some doodads from Hobby Lobby to the front. (The pattern is drafted as a plain bodice so there is a ton of room for creative license.)  It's just an embellishment so it serves no function except decoration.  I also made some satin flowers and just attached them to the waist of the dress with some ribbon streaming from the bottoms of them.  This isn't part of the pattern but there are tons of tutes online about how to make satin flowers.  I felt like it needed something for N's head so I made her a hat fascinator.  I slightly modified the materials to make the fascinator so that it would be a little more sturdy but the basic design is the Broadway Fascinator from Snazzydrawers.

This dress calls for 60 yards of tulle so I just ordered two bolts of tulle from a place called BBCrafts.  I got two bolts of tulle from them for $17, and it was on my doorstep within a week so I was pretty stoked.  You can also find some pretty smokin' deals on Amazon for bolts of tulle.  If you're going to make this dress, two things: plan ahead and order your tulle from online.  This dress requires A LOT of it so that you get that fairy tale effect on the skirt.  I paired this first dress with some microsuede from the costume section of JoAnn's and it was perfect!


The overall construction of the dress was very fast and very simple.  It doesn't require a lot to make this dress pretty amazing.  I think it took me about 3 or 4 hours from start to finish for the second one. Most of that was time spent cutting the tulle down to the measurements I needed for my daughter's dress.  I did use all 60 yards, and when I was done, the skirt did, in fact, stand on its own.  I kept wondering if I stood there and chanted " Treguna Mekoides Trecorum Satis Dee" if it would get up and start dancing with my son's slacks or something.

We picked a pretty windy day to do photos, and because it IS tulle, the wind will pick this up pretty easily so be prepared that you will have to smooth it out a bit if you're out on a windy day.  Small price to pay for beauty and fashion, I say.


My favorite part is the back of the dress.  There are two straps that cross over each other and snap at the sides of the bodice and it's such a unique look.  I was worried about the open back and my daughter (she's pretty conservative), but once she had the dress on, she was over the moon so that didn't even factor into her mind.


The second dress was pretty fun to shoot!  I went with a black nubuck (I got it from Hobby Lobby) for this dress and appliqued a spider to the front of it.  I used the Easy Day Tee (also from Snuggle My Baby) to make my son a shirt that had a spider on it as well.  My daughter agreed to do this dress because the black widow gets to stomp on the boy spider, and well, the boy spider was her brother. Go figure.


My little love said this dress makes her feel like the spider queen and she even made up a song about what the spider queen does and says, but she refused to sing it for the camera...

We picked another windy day for this dress (it's Oklahoma, in the spring.  The wind really does whip across the plain.)  I let the kids have some fun with this photo shoot so they had a chance to play around a little bit with the photos...


They had a blast with these so I thought I'd go ahead and include them in here!  :)!  The underskirt on this is still wide enough that she was able to run around after bubba and play with him.  Even without shoes on, she didn't have much of an issue with the tulle getting underfoot so it was the perfect length.  She's a size 7 in RTW, and this dress was a size 7 and true to size like most of Jenn's patterns.

As I said in the beginning, the skirt construction is pretty simple, and it's put together in such a way that the tulle drapes versus gathers so there's no niggly tulle gathering to contend with.  I think this second dress took me about 3-ish hours.


I got a little more creative with this dress and ordered some red LED lights from Amazon that I attached using mini pockets for the battery packs.  I just safety pinned those to the inside so that I could remove them if my daughter decided she didn't want them anymore.  This is, again, not a part of the pattern, and I only decided to add them after a challenge was laid at my sewing machine. It worked out beautifully, and I seriously love this dress.  It might possibly be one of my favorite, if not the most favorite, project I have ever made.  I almost didn't recognize my little girl as my "little" girl anymore after seeing the pictures from these two shoots.


This dress is perfect for so many things.  You can make dress up clothes, flower girl dresses, Daddy Daughter dresses, costumes...so many different occasions.  We already have this one in mind for the Daddy Daughter dance next year.  She's debating colors right now, but I do believe this pattern will be the one we go with.  I might even do lights again!! :)!

Now, if you are looking at this and thinking, "meh, I really don't need a dress pattern", one of the options is just the skirt!  So, you don't have to plan for a dress if you just want the fairy tale skirt. That's possible, too, and it's equally as amazing!

Okay, so if you've read this far and you HAVE to have this pattern, here's what you do.  This dress released today at Snuggle My Baby Patterns, and you can head over to Jenn's webstore to get yourself a copy at a special release price of $5.  This price will be good until May 3rd so don't miss out on the chance to grab this pattern for yourself!  Just click here: JenLee Fairy Tale Dress. THEN, head over to the Snuggle My Baby Patterns group on Facebook and join us there!  Here, you can ask questions, get inspiration for your own creations, or share your creations to inspire others!  You can join the group here: Snuggle My Baby FB group.  Really, you need this pattern in your life! :)!


Thanks so much for reading along!  Now go grab yourself a copy of the JenLee and sew up something beautiful.

Blessings and Happy Sewing,
Kim

Wednesday, April 26, 2017

Knock It Off Tour (Lulu and Celeste, Sprouting Jube Jube Productions)


Today, I'm one of the stops on the Knock It Off Tour sponsored by Lulu and Celeste and Sprouting Jube Jube.  The challenge: create a "me made" item inspired by retail items.  I spent a good chunk of time looking through Pinterest and Googling different stores to figure out what exactly I wanted to make.  I landed on two outfits: a Dolce and Gabbana cocktail dress and a more casual retro style dress from Alexander McQueen.  Both were way out of my budget, but hey, that's the beauty of being able to sew!!

The first dress that caught my eye was a simple cocktail dress with a lace overlay skirt.  I found a striped floral lace dress on FarFetch.com, and it appears that it is now sold out. However, at the time, it was listed at $3,495.  Just a little out of my price range.
Dolce and Gabbana striped floral lace dress (photo credit:  FarFetch.com)
I took a look at the patterns in my stash and found the Talia Fitted Dress from Laela Jeyne.  It had the option of both a round or v-neck bodice, and it's already a sleeveless dress so it was perfect.  The pattern doesn't call for an overlay on the skirt, but that was an easy enough mod to do.  I also left the skirt as drafted with a little less gather on it since I didn't want to add bulk around the waist. I opted for a red satin as the underskirt since I made this dress for the annual ladies' tea at my church and wanted it to match the "Shine" theme.  I also opted for smaller stripes on the bodice!


Not exactly the same as the D&G dress, but I definitely love the pop of color in the skirt! I also made a teapot clip to go with my dress using the Mad Hatter Tea Set from Super Pop.  The original pattern is for a fabric tea set, but I just used some polyfil to make the teapot into a stuffie that I could attach clips to.


In total, this dress cost me about $25 and two hours to make, so I would call that a win!

After I found the D&G dress on Google, I stumbled onto another dress that I was over the moon for. It was a retro style plaid dress by Alexander McQueen.  The top caught my eye because it reminded me of the inside of my favorite Burberry's coat.  Then, I saw the rest of the dress and was sold.  When I looked at the price tag on this one, it was $1,095 on Lyst.com.  Of course it was because I liked it...back to the pattern stash.  

Alexander McQueen plaid retro dress (photo credit: Lyst.com)
Alexander McQueen was known for his crazy and wild designs, and I've always loved his creations. This dress, however, spoke to me.  It didn't speak loud enough for me to spend over a thousand dollars on it, but it spoke loud enough to inspire me to make one similar to it!  I found the Santa Fe Scooter dress from Bell Bottom Girl.  The original pattern has a longer torso and a shorter flounce than my inspiration dress, but I simply shortened the top by 6 inches and added that to the bottom of the flounce.  The pattern also didn't call for a zipper but I added one into the back seam allowance and didn't need to modify the pattern at all to make that happen.  

I also opted to keep the bias tape finished armholes and neckline of the pattern and went with a purple plaid since I'm just slightly in need of some sun after the winter.  I was concerned that a tan colorway would blend into my skin so purple it was.  I also didn't put a faux belt on the waist so that attention wouldn't be drawn to my waist.

The fit of this dress is relatively loose so there is plenty of room to move around in it.  I love the overall look and fit of this dress, and I do think that I will probably be making a few more of these before the end of the summer!  

For this dress, I spent about $15 for materials and an hour of sewing time.  I would say that $40 and about three hours of my time is a win for two new dresses that would have cost me over $3,500.  I told my husband that I saved him thousands of dollars by spending just $40 at JoAnn's.  I don't think he's convinced, but I'm standing by that statement. :)!  

Thanks so much for stopping by and visiting today!  We're only on Day 3 of the tour so there are plenty of designers still to come.  You can also visit the designers from Day 1 and Day 2 by following the links below!

Monday, April 24


Tuesday, April 25


Wednesday, April 26


Thursday, April 27


Friday, April 28


Thanks again for stopping by today!

Blessings and Happy Sewing,
Kim

Tuesday, April 25, 2017

Jade's Crop Top from Snuggle My Baby Patterns


It may be April, but summer is practically here already in Oklahoma.  My kids have pretty much checked out of school, and I'm pretty much right there with them (just being real...:)!)  I just had the opportunity to test the Jade's Crop Top from Snuggle My Baby Patterns, and my daughter loves it. She wants me to put tulip sleeves on every shirt she owns now.


Okay, so pattern details!!

- Sizes range from 2T - 16.
- Two sleeve styles: fairy wing or tulip
- High-lo hem
- Key hole back tie so no buttons or zippers!
- Layered printing
- Quick and easy sew (took me about 45 minutes from cutting to final stitch)

This top was such a quick sew.  I made this one in a size 7, which is my daughter's ready to wear size, and it was a perfect fit.  I did use the measurement chart to figure out her size, though, because she grows so much between tests that I never know for sure what size she's in.  This one, however, is true to size for ready to wear.

We took a look at both sleeve styles and opted for the tulip sleeve.  After she put it on, Naomi decided that she wants every single shirt to have tulip sleeves from now on.  Since she doesn't typically like anything girly, I was pretty excited that she loved these sleeves!


The back has a keyhole closure at the top with ties so it's pretty easy to put on and take off.  While I am happy to do buttons and zippers, I was kind of happy to see the ties at the neck.  It's a pretty simple way to finish the hems, too!  The ties and neckline are all one single strip of bias tape so that made it quick and easy to finish.  I opted to make my own bias tape, and I did a 1/2" finish (or a 2" wide strip).  You can use any width bias tape that you want for this part so that gives some flexibility when picking the bias tape you want to use.

There were only three pattern pieces so there isn't a lot to assemble and cut out.  The top itself is pretty free flowing so my daughter had plenty of room to run and play when we were at the park. She's pretty particular about anything that clings too tight, so this was right up her alley!  We already have several more of these planned.  Hopefully, I get to them before she grows again!  HA!

"Sooo, how do I get a copy of this pattern?" you ask.  Let me tell ya!  This pattern just released, and it is available for a special release price of $5!  This price is good through May 1st so don't miss out on your chance to get this while it's on sale!  Just head over to Jenn's webstore to grab a copy: Jade's Crop Top.  Jenn also has a Snuggle My Baby Patterns support group on Facebook where you can get inspiration, ask questions, or just hang out with other sewists.  You can join the group here: Snuggle My Baby Patterns FB page!  Thanks so much for reading along!  Now go grab your copy of the Jade's Crop Top and share your creations with us on the FB page!

Blessings and Happy Sewing,
Kim